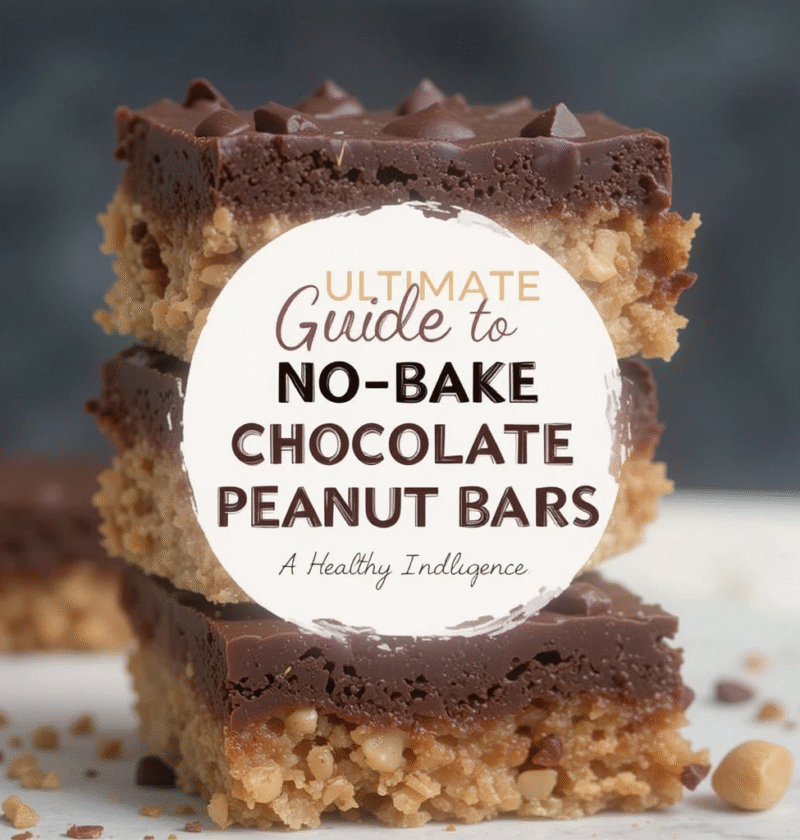
Why This Recipe is a Game-Changer
In a world where our schedules are packed and our cravings are real, finding a dessert that is quick, healthy, and utterly delicious can feel like a miracle. What if you could create a decadent, satisfying treat that requires zero baking, is packed with wholesome ingredients, and caters to a vegan and gluten-free lifestyle all in about 15 minutes?
Enter the No-Bake Vegan Chocolate and Peanut Bar. This isn’t just another recipe; it’s a solution. It’s the answer to last-minute potlucks, after-school snack emergencies, and those late-night chocolate cravings that demand immediate gratification. With a crunchy, salty-sweet base and a rich, creamy chocolate topping, these bars are a masterpiece of texture and flavor. They prove, beyond a shadow of a doubt, that mindful eating doesn’t mean sacrificing indulgence.
This comprehensive guide will not only give you a foolproof recipe but will also delve into the “why” behind the ingredients, explore their health benefits, and provide endless customization options to make this treat uniquely yours.
The Anatomy of a Perfect No-Bake Bar: Deconstructing the Ingredients
The magic of this recipe lies in its simplicity and the powerful synergy of its components. Each ingredient plays a crucial role in building flavor, texture, and nutritional value.
1. The Foundation: Dates and Nuts
- Dates (Medjool are best): Nature’s caramel. Medjool dates are the glue that holds the base together. Their sticky, sweet, and moist flesh eliminates the need for refined sugars or artificial binders. They are a fantastic source of dietary fiber, potassium, magnesium, and antioxidants.
- Peanuts (Roasted and Salted): The star of the show. Peanuts provide the essential crunch and that iconic, nutty flavor. Using pre-roasted and salted peanuts is key—the roasting deepens their flavor, and the salt cuts through the sweetness, creating a balanced taste profile. Peanuts are rich in protein, healthy monounsaturated fats, niacin, and folate.
2. The Binder and Flavor Enhancer: Peanut Butter
- Natural Peanut Butter: This acts as the secondary binder, complementing the whole peanuts and ensuring the base is perfectly cohesive. Opt for a natural peanut butter where the only ingredients are peanuts and maybe salt. Avoid brands with added sugars, hydrogenated oils, or emulsifiers, as they can alter the texture and nutritional quality. Peanut butter adds more protein and healthy fats, making these bars incredibly satiating.
3. The Luxurious Topping: Chocolate and Coconut Oil
- Dark Chocolate (Vegan): The crowning glory. A high-quality dark chocolate (70% cacao or higher) melts into a smooth, rich layer that hardens into a satisfying snap. It provides antioxidants, flavonoids, and iron. Always check the label to ensure it’s dairy-free.
- Coconut Oil: This is the secret to a perfectly firm chocolate topping. When melted with the chocolate, it creates a fluid mixture that pours easily. As it cools, the coconut oil solidifies, giving the topping a firm, stable texture. It also adds a hint of subtle sweetness and beneficial medium-chain triglycerides (MCTs).
4. The Supporting Cast: Oats and a Pinch of Salt
- Rolled Oats (Gluten-Free if needed): Oats are the unsung hero of the base. They absorb excess moisture from the dates and peanut butter, provide a chewy, wholesome texture, and bulk up the bars without overpowering the peanut and chocolate flavors. They are a great source of soluble fiber, specifically beta-glucan, which is known for supporting heart health.
- Sea Salt: A pinch of salt in the base and a flaky sea salt garnish are non-negotiable. Salt is a flavor amplifier it makes the peanuts taste nuttier, the chocolate taste richer, and the dates taste sweeter, elevating the entire experience from good to extraordinary.
The Health Benefits: Indulgence You Can Feel Good About
Unlike most store-bought candy bars, these homemade bars are a powerhouse of nutrition disguised as dessert.
- Rich in Healthy Fats & Protein: The combination of peanuts and peanut butter provides a significant amount of monounsaturated and polyunsaturated fats, which are beneficial for heart health. The protein content helps keep you full and satisfied, preventing energy crashes.
- High in Fiber: Thanks to the dates, oats, and nuts, these bars are an excellent source of dietary fiber, which aids in digestion, promotes gut health, and helps regulate blood sugar levels.
- Packed with Micronutrients: You’ll be consuming a dose of iron, magnesium, potassium, vitamin E, and B vitamins, all of which play vital roles in energy production, muscle function, and overall cellular health.
- Free from Refined Sugars: The only sweetness comes from the natural fructose in dates and the inherent sugars in dark chocolate. This avoids the sharp blood sugar spike associated with refined white sugar.
- Naturally Vegan and Gluten-Free: This recipe is inclusive, allowing those with dairy, egg, or gluten intolerances to enjoy a classic treat without compromise.
Step-by-Step Recipe: No-Bake Vegan Chocolate and Peanut Bars
Yields: 9 large bars or 16 squares
Prep time: 15 minutes
Set time: 1-2 hours
Ingredients:
For the Base:
- 1 ½ cups (225g) Medjool dates, pitted
- 1 ½ cups (200g) roasted, salted peanuts
- 1 cup (100g) rolled oats (ensure gluten-free if necessary)
- ½ cup (125g) natural, smooth peanut butter
- 1 tbsp coconut oil, melted
- 1 pinch of sea salt
For the Chocolate Topping:
- 1 ½ cups (265g) vegan dark chocolate chips or chopped bar
- 1 tbsp coconut oil
- Flaky sea salt, for garnish
Equipment:
- 8×8 inch (20×20 cm) baking pan
- Parchment paper
- Food processor
- Medium heatproof bowl
- Spatula
Instructions:
1. Prepare the Pan:
Line your 8×8 inch pan with parchment paper, leaving some overhang on two opposite sides. This “sling” will make it incredibly easy to lift the entire block of bars out of the pan later for clean cutting.
2. Create the Base:
- If your dates are not very soft and sticky, soak them in warm water for 10 minutes, then drain and pat them completely dry. This step is crucial for a smooth base.
- In the bowl of a food processor, combine the pitted dates, peanuts, and oats. Pulse until the mixture is broken down into a coarse crumb. It should stick together when pressed between your fingers.
- Add the peanut butter, melted coconut oil, and a pinch of salt. Process again until the mixture comes together into a cohesive, slightly sticky dough. This should take about 1-2 minutes. Scrape down the sides as needed.
3. Press and Set the Base:
- Transfer the mixture into your prepared pan. Using your hands or the flat bottom of a measuring cup, press the mixture down very firmly and evenly into every corner. This compact pressing is the key to bars that don’t crumble when you bite into them.
- Place the pan in the refrigerator to chill while you prepare the chocolate topping.
4. Melt the Chocolate Topping:
- Create a double boiler: Fill a small saucepan with an inch of water and bring to a simmer. Place a heatproof bowl on top, ensuring the bottom of the bowl does not touch the water.
- Add the chocolate chips and tablespoon of coconut oil to the bowl. Stir continuously with a spatula until the chocolate is completely melted and smooth.
- Remove the bowl from the heat and let it cool for just a minute.
5. Assemble the Bars:
- Take the chilled base out of the refrigerator. Pour the melted chocolate over the base.
- Use your spatula to spread the chocolate into a smooth, even layer that covers the entire surface.
- Immediately sprinkle with a generous amount of flaky sea salt. This not only looks beautiful but enhances every single flavor in the bar.
6. The Final Chill:
- Carefully transfer the pan back to the refrigerator. Allow the bars to set completely for at least 1-2 hours, or until the chocolate layer is firm to the touch. For the fastest setting, you can place them in the freezer for 30-45 minutes.
7. Slice and Serve:
- Once fully set, use the parchment paper sling to lift the entire block out of the pan and onto a cutting board.
- Using a sharp knife, slice into 9 or 16 bars. For clean cuts, wipe the knife blade with a hot towel between slices.
Chef’s Notes: Tips for Perfect Bars Every Time
- Sticky Dates are Key: The moisture in the dates is what binds the base. If your mixture seems too dry and isn’t holding together, add another tablespoon of peanut butter or a few more dates.
- Press, Press, Press: Don’t be shy when pressing the base into the pan. The more compact it is, the better the final texture.
- Chocolate Tempering (Optional): For a chocolate topping that stays firm at room temperature and has a beautiful shine, you can temper your chocolate. This is a more advanced technique but worthwhile if you’re serving them at a party.
- Prevent Chocolate Seizing: Ensure no steam or water gets into your chocolate bowl while melting, as this can cause the chocolate to “seize” and become grainy.
Customization: Make It Your Own
The beauty of this recipe is its versatility. Don’t like peanuts? Have an allergy? No problem.
- Nut-Free Version: Substitute the peanuts with toasted sunflower seeds or pumpkin seeds. Use sunflower seed butter (sunbutter) instead of peanut butter.
- Different Nut Butters: Almond butter, cashew butter, or even tahini (sesame seed paste) work wonderfully and create a completely different flavor profile.
- Add-Ins for the Base: Stir in ¼ cup of shredded coconut, chia seeds, hemp hearts, or vegan mini chocolate chips after processing the base mixture.
- Flavor the Chocolate: Add a ¼ teaspoon of espresso powder to the chocolate while melting to intensify the chocolate flavor, or a drop of peppermint extract for a festive twist.
- Top It Off: Before the chocolate sets, press whole peanuts, crushed pretzels, or dried rose petals on top for extra visual appeal and crunch.
Storage and Serving Suggestions
- Storage: These bars must be stored in an airtight container in the refrigerator for up to two weeks. The coconut oil in the topping will cause it to soften if left at room temperature for too long. They also freeze beautifully for up to 3 months.
- Serving: Enjoy them straight from the fridge for a firm, satisfying treat. They are perfect as an on-the-go breakfast bar, a post-workout snack, or a sophisticated dessert plated with a few fresh berries.
Conclusion: Your New Go-To Treat
These No-Bake Vegan Chocolate and Peanut Bars are more than just a recipe; they are a testament to how simple, whole-food ingredients can be transformed into something truly spectacular. They require minimal effort, no special skills, and deliver maximum reward in both flavor and nutrition.
So, the next time a craving strikes, bypass the store-bought aisle and head to your pantry. In just 15 minutes of active time, you can create a batch of these decadent, healthy bars that will impress your family, satisfy your soul, and make your body thank you. Happy no-baking!
FAQ Section
Q1: Can I use quick oats instead of rolled oats?
A: Yes, you can. However, quick oats are more finely ground, which may result in a slightly less chewy and more compact texture in the base. The recipe will still work perfectly well.
Q2: My chocolate topping is too hard. What did I do wrong?
A: This is likely due to the ratio of coconut oil. If you used more than a tablespoon, the topping can become very hard and waxy. Stick to the recommended amount for a firm but bite-through texture.
Q3: Why did my base turn out too crumbly?
A: The most common reason is that the dates were too dry. Next time, be sure to soak them in warm water first if they aren’t already soft and sticky. You can also try adding an extra tablespoon of peanut butter to help bind it.
Q4: Are these bars suitable for meal prep?
A: Absolutely! They are an excellent meal prep option. Making a batch on Sunday ensures you have a healthy, grab-and-go snack or dessert ready for the entire week.
Q5: Can I use maple syrup instead of dates?
A: It’s not a direct substitute. Dates provide both sweetness and bulk/fiber that acts as a binder. If you try to use a liquid sweetener, you would need to add significantly more dry ingredients (like oats or nuts) to compensate, which would throw off the entire recipe’s balance. It’s best to stick with dates.