
Why Your Kitchen is the Best Granola Factory
There’s something undeniably magical about the aroma of toasting oats, nuts, and warm spices wafting from your oven. It’s the smell of homemade granola a simple, wholesome, and incredibly versatile food that has earned a permanent spot in pantries worldwide. While store-bought versions offer convenience, they often come with a hidden cost: excessive sugar, unhealthy fats, preservatives, and a price tag that doesn’t match the contents.
Making homemade crunchy granola is a revelation. It’s not just a recipe; it’s a foundational formula that empowers you to become the master of your breakfast bowl. You control the sweetness, the quality of the fats, the combination of nuts and seeds, and, most importantly, you unlock the secret to those irresistible, big crunchy clusters everyone craves.
This guide is more than just a list of ingredients. We will deconstruct the science of granola, provide a detailed, foolproof base recipe, and explore countless variations to keep your breakfasts exciting and nutritious. Prepare to create a granola that is perfectly tailored to your taste, free from unwanted additives, and brimming with the goodness of whole grains, healthy nuts, power-packed seeds, and chewy dried fruit.
Deconstructing Granola: The Four Pillars of a Perfect Batch
Every great granola recipe is built upon four essential components. Understanding the role each plays is the first step to granola mastery.
- The Base: The Heart of the Matter
- Old-Fashioned Rolled Oats: This is the non-negotiable foundation. Their flat, flaky texture absorbs the liquid sweeteners and fats perfectly, becoming crispy and golden during baking. Avoid using quick oats or steel-cut oats, as they will not provide the right texture.
- The Fat: The Crispy Catalyst
- Fat is crucial for achieving that desirable crunch and carrying flavor. It coats the dry ingredients, helping them brown and crisp up in the oven.
- Best Choices: Unrefined coconut oil (imparts a subtle tropical flavor) or a neutral oil like avocado oil or light olive oil. Melted butter can also be used for a rich, decadent flavor.
- The Sweetener: The Glue and The Glaze
- Liquid sweeteners serve a dual purpose: they add sweetness and, when cooled, act as the “glue” that binds the clusters together.
- Best Choices: Pure maple syrup is a classic for its flavor and consistency. Honey offers a distinct floral note. For a vegan option, brown rice syrup is excellent because it is exceptionally sticky, leading to bigger clusters.
- The Flavor & Crunch: The Customizable Canvas
- This is where your creativity shines. This category includes:
- Nuts & Seeds: Almonds, walnuts, pecans, pumpkin seeds, sunflower seeds. They add healthy fats, protein, and textural contrast.
- Spices: Cinnamon, nutmeg, ginger, cardamom, or a pinch of salt to enhance all other flavors.
- Extracts: Pure vanilla extract or almond extract add a layer of warm, complex flavor.
- Dried Fruit: Added after baking to prevent burning. Raisins, cranberries, apricots, dates, etc., provide chewy sweetness and natural sugar.
- This is where your creativity shines. This category includes:
The Foolproof Base Recipe for Ultimate Crunchy Granola Clusters
This recipe is your blueprint. Follow it precisely the first time, and then feel free to experiment with the add-ins on subsequent batches.
Yield: About 6 cups
Prep time: 10 minutes
Cook time: 25-35 minutes
Cooling time: 1 hour (crucial for clusters!)
Ingredients:
Dry Ingredients:
- 3 cups (270g) old-fashioned rolled oats (not quick oats)
- 1 cup (120-150g) raw nuts, roughly chopped (e.g., almonds, walnuts, pecans)
- ½ cup (70g) raw seeds (e.g., pumpkin seeds, sunflower seeds)
- 1 teaspoon ground cinnamon
- ½ teaspoon fine sea salt
Wet Ingredients:
- ½ cup (120ml) pure maple syrup or honey
- ⅓ cup (80ml) unrefined coconut oil, melted (or avocado oil)
- 1 teaspoon pure vanilla extract
Add-after-baking:
- ⅔ cup (90g) dried fruit, chopped if large (e.g., cranberries, raisins, chopped apricots or dates)
Equipment:
- Large mixing bowl
- Small saucepan or microwave-safe bowl
- Rimmed baking sheet (half-sheet pan)
- Parchment paper or a silicone baking mat (highly recommended)
Step-by-Step Instructions:
- Preheat and Prepare: Preheat your oven to 325°F (160°C). Line your rimmed baking sheet with parchment paper or a silicone mat. This prevents sticking and makes cleanup a breeze.
- Combine Dry Ingredients: In your large mixing bowl, combine the rolled oats, your chosen nuts and seeds, cinnamon, and salt. Stir until everything is evenly distributed.
- Warm the Wet Ingredients: In your small saucepan over low heat, warm the maple syrup (or honey) and coconut oil until the oil has just melted and the mixture is easy to stir. Alternatively, you can microwave them together in a bowl for 30-45 seconds. Remove from heat and stir in the vanilla extract.
- Combine Wet and Dry: Pour the warm liquid mixture over the dry oat mixture. Using a large spatula or a wooden spoon, fold and stir until every single oat and nut is thoroughly coated. The mixture will be shiny and slightly wet.
- Press for Clusters! This is the most important step for clusters. Transfer the granola mixture onto your prepared baking sheet. Spread it out into an even layer. Now, take your spatula or clean hands and press down firmly all over the granola. Compress it into a tight, compact layer. This pressing is what will allow the granola to stick together and form large, crunchy chunks as it bakes.
- Bake to Perfection: Place the baking sheet in the preheated oven. Bake for 25-35 minutes. DO NOT STIR. Stirring will break up your potential clusters. The granola is done when the edges are deep golden brown and the top looks dry. The center may still feel slightly soft—this is okay, as it will continue to crisp up as it cools.
- The Grand Cool-Down: Remove the pan from the oven. This is critical: let the granola cool completely on the baking sheet without disturbing it. This can take a full hour. As it cools, the sugars and syrups harden, cementing the clusters and creating that signature crunch. Rushing this step will result in crumbly granola.
- Add Fruit and Break Up: Once the granola is completely cool to the touch, break it into clusters of your desired size by lifting the parchment paper and cracking it. Transfer the clusters to a large bowl and stir in your dried fruit.
- Store: Store your homemade granola in an airtight container at room temperature. It will keep beautifully for up to 2 weeks.
Pro Tips for Granola Perfection (The Science of Crunch)
- Low and Slow: A moderate oven temperature (325°F/160°C) is key. It allows the granola to dry out and crisp up without burning the sugars on the outside before the center is done.
- The Power of Pressing: Never skip the pressing step. The more compact the layer, the bigger your clusters will be.
- No Peeking, No Stirring: Resist the urge to open the oven door frequently or to stir the granola while it bakes. This releases heat and prevents the cluster formation.
- Cool Completely: Patience is a virtue. Cooling on the pan is non-negotiable for maximum crunch.
- Add Egg White for Extra Clustering: For supremely mega-clusters, whisk one large egg white until frothy and fold it into the granola mixture along with the wet ingredients. The protein in the egg white creates an incredible binding network.
Customization: Your Granola, Your Rules
This base recipe is a blank slate. Here are some ideas to inspire your next batch:
Theme-Based Variations:
- Tropical Paradise: Use macadamia nuts and coconut flakes (add in the last 5 minutes of baking). Use mango or pineapple dried fruit. A tablespoon of coconut oil enhances the theme.
- Apple Pie: Use pecans as the nut. Add 1 tsp cinnamon + ¼ tsp nutmeg to the dry mix. After baking, stir in finely chopped dried apples.
- Chocolate Lover’s: After the granola has completely cooled, stir in ½ cup of dark chocolate chips or cacao nibs for a rich, antioxidant boost.
- Gingerbread Spice: Use walnuts. Add 1 tsp cinnamon, 1 tsp ground ginger, and ¼ tsp cloves to the dry mix. Stir in chopped crystallized ginger after baking.
- Superfood Seed: Use ½ cup oats and add ½ cup each of quinoa flakes and buckwheat groats. Load up on chia seeds, flax seeds, and hemp hearts (add hemp hearts after baking to preserve nutrients).
Dietary Adaptations:
- Gluten-Free: Ensure your oats are certified gluten-free.
- Vegan: Use maple syrup or brown rice syrup as the sweetener and a plant-based oil.
- Nut-Free: Use all seeds (sunflower, pumpkin, pepitas) and maybe even toasted coconut chips.
- Lower Sugar: Reduce the maple syrup to ⅓ cup and lean on the natural sweetness of the dried fruit you add later.
How to Enjoy Your Homemade Granola
- The Classic: With milk, plant-based milk, or yogurt and fresh fruit.
- Smoothie Bowl Topper: Adds the perfect crunch on top of a creamy smoothie base.
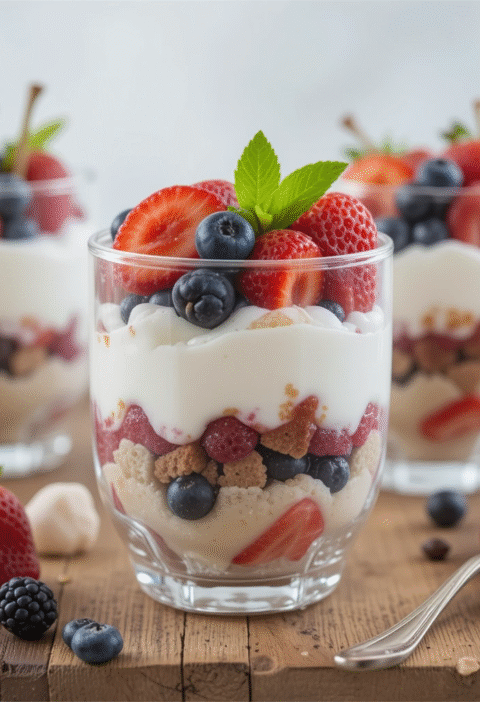
- Parfait Layer: Layer it with Greek yogurt and berries in a glass for a beautiful and healthy dessert or breakfast.
- Straight from the Jar: The ultimate healthy snack.
- Ice Cream Sundae Topper: Adds a wonderful texture contrast to vanilla ice cream.
- On-the-Go Energy: Pack a small container for a hiking or post-workout snack.
Conclusion: Embrace the Simplicity and Reward
Making homemade crunchy granola is a simple, satisfying act of self-care. It connects you to the food you eat, allows for creative expression, and results in a product far superior to anything you can buy. With this guide, you are equipped not just with a recipe, but with the knowledge and confidence to create a truly perfect, personalized granola. You’ve learned the pillars of its structure, the secret to those crave-worthy clusters, and endless ways to make it your own.
So, preheat your oven, gather your oats, nuts, and seeds, and fill your home with the unmistakable, comforting aroma of something made from scratch, with care. Your breakfast—and your taste buds—will thank you.